13,84,83,04,05,06
Stem weevils and budworms: monitoring and control on 2 fronts - Cloned
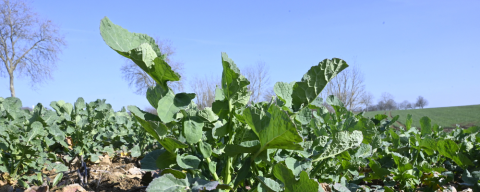
At the end of a record number of rainy days, the clear skies and sudden, exceptional rises in temperature at the end of February were conducive to the drying out of the best-filtered plots and the advancement of the rapeseed stage, but also to major flights of stem weevils and leaf beetles. While current priorities are focused on nitrogen inputs at the end of winter, we must not neglect to monitor and control these two insects, which this year appear at the same time.
Rapeseed stem weevils can cause stem bursts, which penalize yield components, particularly in dry years. Egg-laying disrupts sap flow, making plants sensitive to subsequent stresses and limiting their ability to compensate. Hydric stress or an attack by another pest in spring on an oilseed rape previously weakened by stem weevil are thus more damaging. Control methods are still effective, but the positioning of the intervention is crucial to guarantee the effectiveness of the protection.
Peak of flights possibly reached at the end of February, on rapeseed at sensitivity stage
Southwest
As the weather warmed up at the beginning of the month, the first flights of stem weevils, mainly on cabbage but also on rapeseed, took place in the Occitanie and ex-Aquitaine regions, but at generally low levels on rapeseed crops still in vegetation recovery or early bolting. The drop in temperatures and return of rain over the following days were unfavorable to the intensification of flights and egg-laying activity by females.
The return of clear skies and exceptional temperatures over the last few days have been favorable to significant weevil flights, with the probability of captures and presence in plots currently reaching its peak, on oilseed rape crops in full bolting, mostly at D1-D2 stages (source: BSV Occitanie-Nouvelle Aquitaine), and for some weakened by excess winter water and lack of nitrogen when vegetation resumes.

As a general rule, it is advisableto intervene 8 - 10 days after the first "significant" captures, or ideally at the regional flight peak (consult the BSV for the date of the flight peak at regional level). In fact, the mere presence of the pest in the crop constitutes a nuisance threshold. The aim is to intervene when as many insects as possible are in the plot, and before egg-laying begins.
With the flight peak probably underway, an intervention could be launched in the week of March 02 to 09 to effectively control stem weevil populations, subject to a drop in catches within the BSV network next week.
Insecticide solutions still effective
The success of chemical control depends on the positioning of the intervention and the persistence of action. To date, Terres Inovia has not observed any decline in efficacy in the field. Monitoring results show no worrying emergence of resistance.
DECIS PROTECH 0.33 L/ha and KARATE ZEON 0.075 L/ha are effective in reducing rapeseed stem weevil damage (reduction in the number of deformed and/or shattered stems).
TREBON 30 EC is comparable to these references. In the case of late infestation and presence of budworms, it is also effective against the latter.
SHERPA 100 EW and CYTHRINE MAX are slightly behind. MAVRIK SMART, on the other hand, is inferior to the references on stem weevil and should be reserved for possible control of meligethes between stages D1 and E-F1.
Caution: TREBON 30 EC and MAVRIK SMART should be reserved for possible control of meligethes between stages D1 and E-F1.
Meligèthes: Vigilance is essential
A sudden and massive arrival
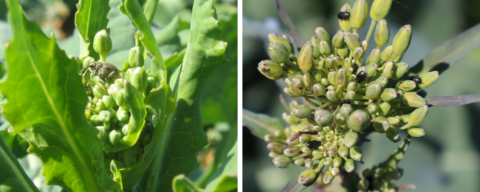
The exceptionally warm weather and sunny spells of the past few days have been very favorable to insect flights, including the meligèthe, which can easily be caught in tanks or observed in plots, particularly on the most advanced rapeseed plants. The beetle is above all a pollinator. Its diet is based on pollen. However, when flowers are still at bud stage, they perforate them to reach the stamens, which can damage the pistil and lead to abortion. The risk of losses is all the greater when the buds are small; but as soon as the flowers are open, the pollen is free to access, and the nuisance generally becomes nil and treatment unnecessary. Females lay eggs in the buds during flowering, but this does not damage the plant.
Visit your plots to assess the condition of your colza and the presence of the beetle
The more vigorous and healthy the crop, the more it can withstand the presence of budworms, even if they are abundant. On the contrary, the more stunted, stressed or constrained the crop, the more susceptible it will be to attack. Observing the condition of the rapeseed is therefore just as important as observing the pest.
Here are a few rules to bear in mind when characterizing the risk of meligèthes on rapeseed:

- Rapeseed fertilization: what to do if the soil is too wet Observe plots from the D1 stage (BBCH50), corresponding to the appearance of clustered buds still hidden under the leaves, to the F1 stage (BBCH60), corresponding to the first flowers opening on half the plants. At the D1 stage, when flower buds are present and still hidden under the terminal leaves, beetles are more difficult to observe. You need to take the time to analyze the area of leaves surrounding the buds. At stage D2 (BBCH53) and E (BBCH57), the buds are fully visible and the larches are easier to spot.
- Counting at the edges or on the tallest plants is not representative of the situation. It is advisable to count on 4 x 5 or 2 x 10 consecutive plants; then calculate an average or a % per plant to be compared with the thresholds mentioned in the table below, taking into account the crop's ability to compensate.
- Avoid trap plants if present.
- Vigilance must now be maintained through regular plant counts, in order to determine where you stand in relation to the thresholds.
- Vigilance is also essential in situations where a tall, very early variety (e.g. ES Alicia or DK Exavance) is mixed. This practice enables us to control certain weak to moderate attacks, but does not rule out monitoring! In the event of heavy attacks, beyond the thresholds indicated below on the plants of interest, control of the populations of meligèthes may be justified.

Control strategy: maintain the population at a tolerable level using appropriate specialties
The aim of the control strategy is to maintain the population at a tolerable level (and not to eradicate it), so that flowering can start without major delays, and so that compensation can be expressed to the full. Rapeseed has considerable capacity for compensation. When the crop is vigorous, it can withstand even heavy attacks by beetles.
Meligethes are resistant to "-ine" pyrethroids (lambda-cyhalothrin, deltamethrin, cypermethrin, etc.). Tau-fluvalinate and etofenprox are 2 pyrethroids that escape rapid metabolism by meligethes and retain their potential efficacy.
Active substances effective on meliger beetles :
- Etofenprox (TREBON,30EC, UPPERCUT 0.2 l/ha)
- Tau-fluvalinate (MAVRIK SMART, TALITA 0.2 l/ha)
In case of concomitant presence of meligethes and rapeseed stem weevils at the intervention threshold, give preference to the use of Etofenprox-based solutions, taking care to respect the conditions of use of the corresponding insecticide specialties.
Recommendations for use
Optimum spray volume of around 200 l/ha: to optimize the effectiveness of insecticide spraying, it is advisable to work at "normal" volumes, avoiding low volumes of less than 100 l/ha.
The context in which spraying is carried out is important: sprayer settings, climatic conditions, characteristics of the product applied.
Protection of bees: Dangerous for bees (phrase SPE8): to protect bees and other pollinating insects, do not apply during flowering and/or exudate production periods, with the exception of uses benefiting from the F, PE, or FPE bee label. In the event of late application (e.g. E stage with first flowers appearing), it is imperative to use effective solutions which benefit from a bee exemption: MAVRIK SMART, TREBON 30EC (use-by stage BBCH61). Please note: these applications are subject to a decree governing application times: 2 hours before sunset and 3 hours after sunset.
Reasonable use of these solutions is essential. Read labels and available documentation carefully, and follow recommendations for use.
Your regional contacts
- Alexandra DENOYELLE (a.denoyelle@terresinovia.fr) - Regional Development Engineer - Auvergne Rhône-Alpes and Provence Alpes Côte d'Azur
- Quentin LAMBERT (q.lambert@terresinovia.fr) - Regional Development Engineer - Occitanie
- Quentin LEVEL (q.level@terresinovia.fr) - Regional Development Engineer - Ex-Aquitaine, Gers, Hautes-Pyrénées
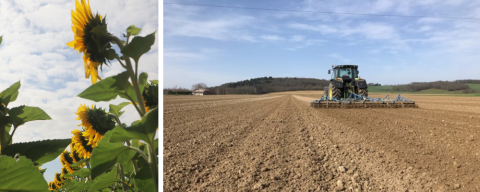
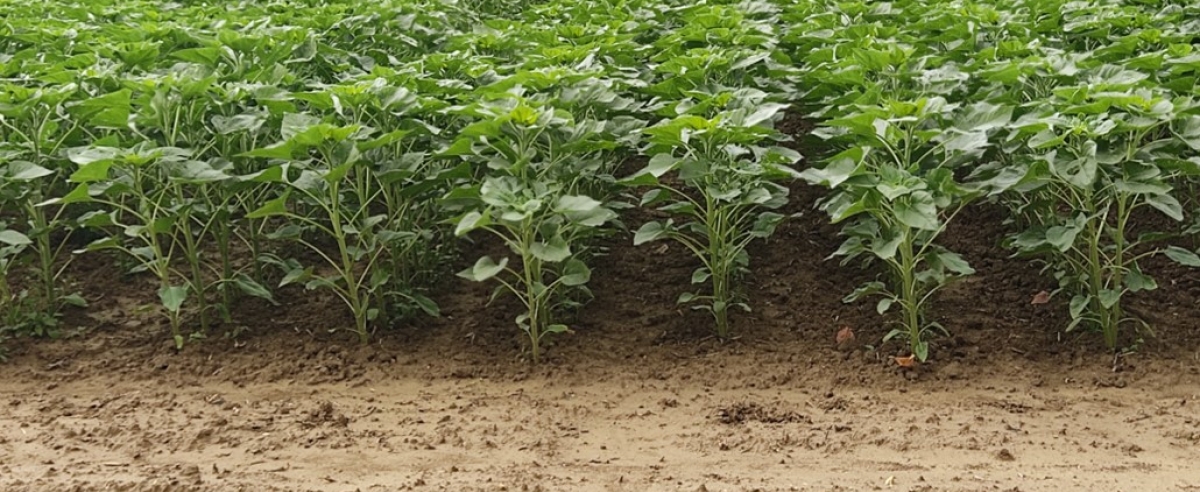
Sunflower pre-seeding preparation: a crucial stage for establishment
Preparing the plots before sowing is already a key step towards obtaining a robust sunflower. The main challenge this year will be to prepare the soil in good moisture conditions.
Preparing the plots before sowing is already a key step towards obtaining a robust sunflower. The main challenge this year will be to prepare the soil in good moisture conditions.
There are two major issues to consider when carrying out seedbed preparation operations:
1-Preserve soil structure
On clay soils, the structural state of the soil must not be degraded by seed preparation operations. In late winter, deep tillage should be avoided. Only in conditions of perfect drainage at working depth, which should be extremely rare this year, can clay soils be cracked and aerated.
For silty soils, deep cracking or ploughing may be necessary, even late in the season, just before sunflower sowing.
2-Get a seedbed with at least as much fine soil as clods, to ensure good soil-seed contact.
Caution: too many passes can result in excess fine soil, which can be detrimental in soils prone to capping or erosion.
Raisonner le type d’outils, ainsi que le nombre de passages est indispensable
La préparation des parcelles en sortie d’hiver s’appuie sur 2 piliers :
- Travailler des sols ressuyés, à consistance friable sur tout le profil travaillé. C’est le cas si les mottes, pétries dans la main, s’émiettent sans coller et donnent de la terre fine. Cette règle fondamentale invite à réaliser des observations très régulières de la consistance du sol, sur toute la profondeur de travail envisagée. Cela semble particulièrement crucial après l’hiver très pluvieux que nous venons de connaitre, afin de déclencher les opérations de reprise dès que les premiers créneaux favorables se présenteront (la fenêtre risque d’être courte cette année), et d’être prêt à semer dès le début du mois d’avril.
Le choix et les conditions d’utilisation des outils de travail du sol.
Outre l’état du sol au moment de l’intervention, ces deux autres critères s’avèrent déterminants pour réussir la préparation au semis.
- Privilégier les outils à dents non animés pour préparer le lit de semences. Si 2 passages sont envisagés, le 1er peut être réalisé à 10-15cm de profondeur, sans rouleau pour favoriser le réchauffement du sol. Le 2ème passage à 6-8cm aura pour objectif principal de niveler et d’affiner
- Combiner les outils pour limiter le nombre de passages
- Lutter contre la compaction du sol, en utilisant des équipements de type roues jumelées ou pneus basse pression. En l’absence de tels équipements, vérifier et adapter la pression des pneumatiques.
Dans quel cas réaliser des faux semis printaniers ?
Sur des flores printanières et estivales qui lèvent tôt en saison comme l’ambroisie, la renouée liseron, le xanthium ou même un peu plus tardivement le datura, le faux-semis peut s’avérer efficace pour réduire les infestations dans le tournesol.
Le faux-semis consiste à réaliser un travail superficiel du sol assez tôt en saison pour faire lever les adventices, bien rappuyé avec un rouleau et positionné de préférence avant une pluie. 1 à 3 semaines après, on détruira ces levées, soit chimiquement dans les situations où le glyphosate est autorisé, soit mécaniquement, en veillant à remuer le sol le moins possible pour éviter de provoquer de nouvelles germinations. Cette stratégie s’accompagne souvent d’un décalage de la date de semis du tournesol de 15 à 20 jours, nécessaire à la réalisation de cette chaine d’interventions.
Attention, des semis tardifs de tournesol, au-delà du 1er mai, peuvent pénaliser les résultats de la culture. Un compromis est donc à trouver entre bénéfices retirés du faux-semis, et risques occasionnés pour le tournesol. Ce décalage de la date de semis est à réserver aux situations où il est prioritaire d’alléger la pression exercée par les flores dites « problématiques », car difficiles à détruire et exerçant une forte concurrence sur la culture (ambroisie, renouée liseron, tournesol sauvage, xanthium).
Vos contacts régionaux
- Quentin LAMBERT (q.lambert@terresinovia.fr) – Ingénieur régional de développement – Occitanie
Quentin LEVEL (q.level@terresinovia.fr) – Ingénieur régional de développement – Ex-Aquitaine, Gers, Hautes-Pyrénées - Alexandra DENOYELLE - Terres Inovia (a.denoyelle@terresinovia.fr) - Auvergne Rhône-Alpes et Provence Alpes Côte d'Azur
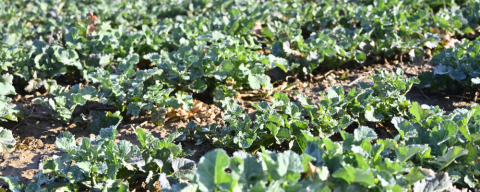
Excessive winter rainfall penalizes crop recovery
The wet, rainy conditions at the end of winter, which this year follow a winter period marked by significant melting of rapeseed in the South-West following episodes of cold and frost, are slowing down or even penalizing the crop's recovery in two ways: a lack of practicability of the plots, preventing nitrogen and sulfur inputs, and excess water that can cause asphyxia or even fermentation of the root system.
The wet, rainy conditions at the end of winter, which this year follow a winter period marked by significant melting of rapeseed in the South-West following episodes of cold and frost, are slowing down or even penalizing the crop's recovery on two counts: a lack of practicability of plots, preventing nitrogen and sulfur inputs, and excess water that can cause asphyxia or even fermentation of the root system. This raises the question of the fertilization strategy to adopt for late returns to the field and, in certain situations (flooded valley bottom plots, hydromorphic soils, low-filtering plains, etc.), the maintenance of certain plots.
Adapting fertilization practices to the condition of the colza at harvest time
Reduce the total nitrogen dose only in plots severely affected by excess water.
In most situations, the colza plants were well established and developed at the start of winter. Although excess water over the past few weeks has prevented the application of nitrogen at the start of vegetation, the condition of the colza (deep roots, high autumn biomass) is not a limiting factor for an unhindered recovery. In this context, the forecast spring nitrogen doses can be maintained. The only question is how to divide up the doses.
On the other hand, for plots where excess water stagnates on the surface (lower slopes, flooded or saturated non-drained plains, hydromorphic soils), penalizing the recovery of colza, it is important to adapt the fertilization strategy on a case-by-case basis:
For plots that were initially poorly developed in autumn (poor planting, early pest damage, etc.) and faced with significant excess water, we may consider lowering their yield potential, and by extension the total dose to be applied in spring. Oilseed rape crops with poorly developed root systems in autumn and damaged by excess water will be less able to compensate for biotic stress (pest attacks, disease, soiling) and abiotic stress (water stress) in spring. To avoid making investments that will probably not pay off at harvest, it is advisable to control operating costs as much as possible, especially fertilizer costs, which are generally the heaviest for the crop.
For plots where the rapeseed has been well established (homogeneous, dense stand, low soil contamination, high biomass in autumn, little pest damage), it is advisable to monitor its progress over the next few days. The likelihood of a smooth recovery is much greater, which means that, barring exceptional circumstances, it is not necessary to revise the forecast doses downwards.
Fractionate inputs to support the recovery and guarantee nitrogen nutrition right up to flowering
As soon as plots are ready for use again, and if weather conditions are favorable, we recommend adapting the 3-spray nitrogen strategy for the weakest colza plants, with a moderate first spray of 30 to 40 uN to enable the plant to support its growth. A final application of 40 NU should be reserved for the E stage (separated buds). The remainder can be applied at stages D1-D2 (buds together). In this case, there's no point in supporting the recovery with a substantial input from the outset, as the rapeseed's absorption capacity is limited!
For the most healthy rapeseed (> 1 kg/m² at winter's end) and/or well-established plants already at C2 (visible internodes) or even D1 stage, an initial application of around 60-70 uN should be made when the plots are passable. There's no need to hurry with these colza crops, whose good rooting guarantees a good capacity to absorb nitrogen from the soil. The balance can be applied between the D2 and E stages.

Don't forget sulfur
Rapeseed is a very demanding crop in terms of sulfur. The risk of deficiency is much greater in difficult years, when there is a lot of excess water in the autumn and at the end of winter. Consequently, we must not neglect sulfur fertilization of the crop, preferably with sulfate fertilizers (ammonium sulfate, sulfur ammonium nitrate, etc.) for a total of 75 units to be applied at the beginning of bolting (Stages C2-D1).
A reminder of the effects of excess water on rapeseed metabolism
In certain situations (hydromorphic soils, flooded plots, saturated soils with poor filtration, poorly established and/or poorly developed fall rape crops) where rape crops are "completely at a standstill", the question of turning over and replacing the crop may arise. Here are a few reminders about the effect of excess water on rapeseed activity, and the importance of making a detailed diagnosis of the plots concerned before making any decisions.
Excessive water can affect the metabolic activity of oilseed rape on two levels:
Root asphyxia
When soil oxygen levels fall below 10%, nitrogen uptake is blocked, penalizing nitrogen nutrition and, by extension, plant growth.
Fermentation of the root system
In the prolonged presence of water, rapeseed roots ferment, leading to an accumulation of ethanol in the leaves. As ethanol accumulates, photosynthesis, and by extension growth, is affected (the leaf takes on a brown to red color). If the accumulation becomes too great, foot loss is observed.
Aggravating factors
These phenomena are exacerbated by low biomass levels at winter's end, combined with poor plant establishment (rooting depth 15 cm, "forked" or "bent" pivots), the origin of which is soil structure problems, and sometimes basic fertilization. Soiling and autumn pest damage (flea beetle larvae and/or terminal bud weevils) are also factors limiting the compensation and recovery capacity of oilseed rape crops, particularly when they are underdeveloped in autumn.
So, depending on the growth and development dynamics of the rapeseed in autumn, its rooting quality, the state of soiling of the plot, the damage caused by autumn pests and the speed at which the soil dries out, the effects of excess water on recovery capacity, and by extension on yield potential, can be very different from one plot to another.
Maintain or turn over? A decision not to be taken lightly!
In certain situations where the colza does not seem to be recovering, the question arises as to whether the plot should be maintained or turned over. While the decision is straightforward in extreme cases (where the plot is intact or, on the contrary, shows heavy root necrosis), it is much more delicate in intermediate situations, depending on the percentage of the plot concerned and, above all, the evolution of the symptoms.
Diagnose each plot carefully to determine whether it should be maintained
First of all, it's important to assess the impact of turning the plot over in relation to maintaining the crop: the investment already made, regulatory aspects, the potential and feasibility of the replacement crop, depending on the herbicides used.
To assess the relevance of turning over a plot, you need to estimate the rapeseed's capacity to compensate, its fresh biomass (green weight expressed per m²) and the density of the stand, as well as any aggravating factors (hydromorphy, weediness, poor rooting, pest damage, heterogeneous stand, etc.). There's no point in leaving poor colza in plots that are likely to get dirty quickly in spring, and whose yield potential is very limited.
Here are a few points of reference to help you decide whether or not to keep plots where suspicions persist:
1. Plant stand
Depending on soil type, from 5 to 10 healthy, well-distributed plants/m², with controlled weediness, turning over the plot is not recommended.

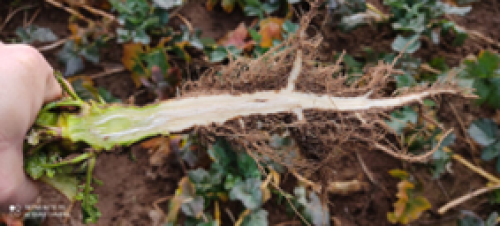
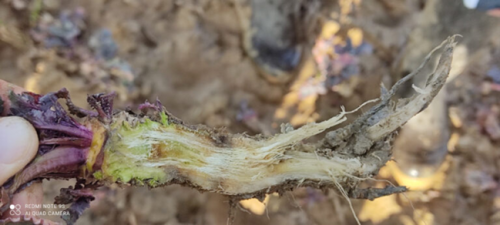
2. Root health
To observe root necrosis, roots must be taken and cut longitudinally to identify the affected areas. If root necrosis is too severe, the plant's survival is seriously compromised. Depending on climatic conditions (particularly the return of a rainy period), necrosis may evolve. It is therefore advisable to regularly check the progress or stagnation of necroses in lightly to moderately impacted plots to confirm the diagnosis.
| Longitudinal section of a healthy rapeseed root | Longitudinal section of a necrotic rapeseed root |
| 
|
3. Percentage of plot affected by damage
In order to consider turning, the surface area affected by heavy necrosis must be sufficient to justify new expenses (operating costs and passage costs). If the surface area affected represents only a few percent of the plot, the decision will be made to maintain the crop in the area, but it will be necessary to be vigilant about weed infestation at the end of the cycle, particularly grass infestation. Weed management should be considered during intercropping and in the following crop.
4. Level of infestation with flea beetle larvae or terminal bud weevils
This is an aggravating factor in the presence of root necrosis.
In all cases, the stress tolerance and compensatory capacities of rapeseed in spring are likely to be limited in situations where root systems are damaged by excess water. This must be taken into account when planning spring fertilization!
Replacement crops
When turning over a plot and replacing a crop, it is important to take into account the history of herbicide specialties used in autumn/winter, in order to adapt the choice of species. Click here for a table of possible replacement crops after turning over an oilseed rape plot, depending on the weed control program used.
Your regional contacts
- Quentin LAMBERT (q.lambert@terresinovia.fr) - Regional Development Engineer - Occitanie
- Quentin LEVEL (q.level@terresinovia.fr) - Regional Development Engineer - Ex-Aquitaine, Gers, Hautes-Pyrénées
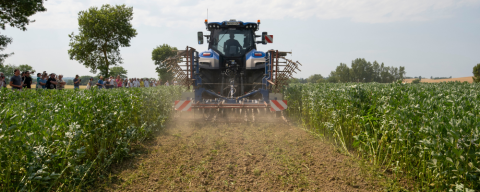
Successfully destroying winter cover crops
The period for destroying winter cover crops is approaching. This operation, which is designed to completely remove the plant cover and create a soil structure favorable to the next crop, must be carried out under optimum soil moisture conditions. However, in the event of a rainy winter, as is the case this year, monitoring soil moisture levels is crucial to identifying the rare windows of opportunity that will arise for destruction.
The period for destroying winter cover crops is approaching. This operation, which is designed to completely remove the plant cover and create a soil structure favorable to the next crop, must be carried out under optimum soil moisture conditions. However, in the event of a rainy winter, as is the case this year, monitoring soil moisture levels is crucial to identifying the rare windows of opportunity that will arise for destruction.
Comment choisir la période de destruction des couvert hivernaux ?
Le déclenchement de la destruction doit faire l’objet du meilleur compromis entre l’atteinte des bénéfices du couvert (protection contre l’érosion, piège à nitrates, …), et le fait d’éviter de porter préjudice à la culture suivante par épuisement des ressources du sol, dégradation de la structure, ou augmentation de la pression ravageurs (limaces). Elle doit en outre être raisonnée en fonction du stade du couvert, sa composition, la présence d’adventices et la date prévisionnelle du semis de la culture suivante.
- Pour un couvert à dominante crucifères ou graminées, la destruction doit survenir au moins deux mois avant la date prévisionnelle de semis de la culture suivante, afin d’éviter une faim d’azote sur les premiers stades de développement de la culture.
- Pour un couvert à dominante légumineuses, la destruction peut être plus tardive, jusqu’à trois semaines avant la date prévisionnelle de semis. Dans ce cas de figure, le principal point de vigilance concerne la présence de résidus non dégradés au moment du semis.
Les conditions d’intervention sont cruciales pour les destructions mécaniques, tout particulièrement sur sols argileux. Les couverts contribuent au ressuyage du sol durant l’hiver, ils participent également au maintien d’une humidité au sol, d’autant plus importante avec des fortes biomasses ou s’ils contiennent des graminées. Il est ainsi primordial de détruire le couvert dès qu’une fenêtre favorable se présente, en d’autres termes, dès que le sol est suffisamment ressuyé sur tout le profil travaillé (consistance friable, ou au pire semi-plastique) pour limiter les risques de tassement ou de lissage. Pour cela, un suivi régulier des conditions d’humidité du sol s’impose à partir de février.
La destruction tardive d’un couvert hivernal à forte biomasse peut conduire à l’assèchement de sols à faible réserve utile, surtout si la fin d’hiver et le début du printemps sont marqués par un déficit de pluviométrie. L’alimentation hydrique de la culture suivante risque alors d’être pénalisée, en particulier en conduite pluviale.
Aussi, il faut savoir arrêter la progression d’un couvert quand il atteint 2 à 4 tonnes de biomasse par hectare (1 à 2 kg de matière verte par m²).
Vouloir trop « pousser » un couvert tardivement, peut conduire, en cas de scénario climatique défavorable, a des destructions trop tardives.
Quel mode de destruction pour mes couverts ?
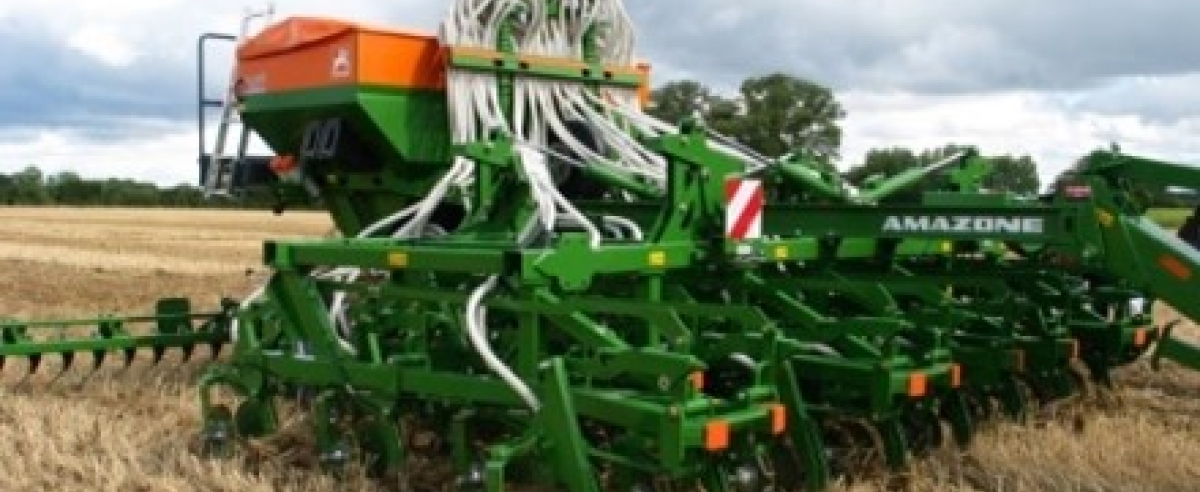
Les techniques de destruction sont multiples et doivent être choisies en bonne cohérence avec les caractéristiques des espèces implantées et les propriétés du sol. En fin d’hiver, le labour ou des travaux profonds ne pourront être envisagés que sur les sols limoneux ou sableux. Sur sols argileux, le ressuyage suffisant du sol et des interventions qui restent superficielles, sont 2 conditions indispensables. Dans des situations avec des couverts bien développés, un broyage préalable peut être nécessaire.

Les travaux menés par Terres Inovia dans le cadre du réseau Syppre Lauragais ont montré que sur des couverts à tige creuse (féverole, phacélie), de nombreux matériels présentent des résultats satisfaisants de destruction (herse rotative, scalpeurs, déchaumeurs à disques indépendants, rouleaux hacheurs). La herse rotative sans rouleau, utilisée à faible profondeur (5-7cm) sur des couverts moyennement développés, assure la dévitalisation des plantes et la création d’un lit de semence favorable à la culture suivante. Le débit de chantier reste toutefois faible, tout comme l’efficacité sur les plantes à pivots et les graminées.
La difficulté principale consiste bien souvent à détruire les graminées adventices qui peuvent se développer dans le couvert pendant l’hiver, auquel cas, les outils à bon recouvrement ou équipés d’ailettes se détachent en termes d’efficacité, même si celle-ci est rarement totale. Aussi, la présence d’adventices et notamment de graminées justifie une destruction précoce, afin d’intervenir sur des stades jeunes, et viser une implantation de la culture suivante sur un sol propre.
Si le choix se porte sur la destruction chimique, des couverts développés vont demander des doses élevées de glyphosate. L’ajout de 2-4D peut améliorer l’efficacité de destruction des dicotylédones, mais s’il est utilisé, veiller rigoureusement au délai d’application avant semis du tournesol (30 jours). Précisions également que le levier de destruction chimique peut être mobilisé après une 1ère étape de destruction mécanique, si des graminées adventives n’ont pas été détruites et si les conditions d’humidité ne sont pas favorables. Dans ce cas de figure, il conviendra de moduler les doses utilisées.
Quel que soit le mode de destruction, il faudra être vigilant à la présence de résidus non dégradés ou trop grossiers qui risquent de perturber le passage de l’élément semeur de la culture suivante, ou nuire au contact sol-graine. Les résidus peuvent également générer une activité plus importante des mollusques au printemps. Une surveillance particulière doit être mise en place pour éviter des potentiels dégâts sur la culture suivante.
Pour aller plus loin
Clémence DE SAINTIGNON - Terres Inovia - c.desaintignon@terresinovia.fr
Measure your biomass at the end of winter to optimize your nitrogen inputs in spring
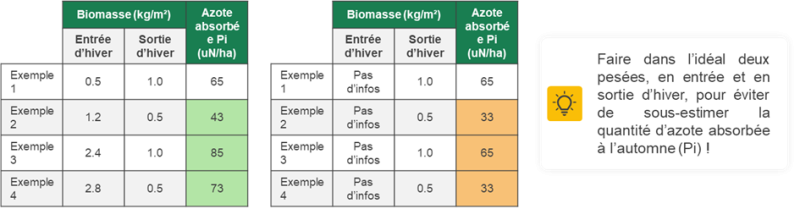
Conditions at the start of the campaign enabled good overall development of rapeseed crops, where these did not suffer from poor planting conditions. In order to estimate the amount of nitrogen to be applied in the spring, it is important to measure the biomass of the rapeseed at the beginning and at the end of the winter.
Conditions at the start of the campaign enabled good overall development of rapeseed crops, where these did not suffer from poor planting conditions. In order to estimate the amount of nitrogen to be applied in the spring, it is important to measure the biomass of the rapeseed at the beginning and at the end of the winter.
Weighing in at the end of winter
The rise in temperatures over the past week will enable the colza plants to start growing again, after a vegetative rest and a melting of biomass at the start of winter, following successive drops in temperature between late November and early January. It's now time to start weighing the colza plants, in order to determine the quantities of nitrogen to be applied before and/or during bolting, depending on the situation.
Biomass estimation method
Weighing is carried out on 2 to 4 1m² plots, cutting the colza at ground level for a good estimate of its above-ground biomass. The sampling method varies according to rapeseed spacing (see table opposite).
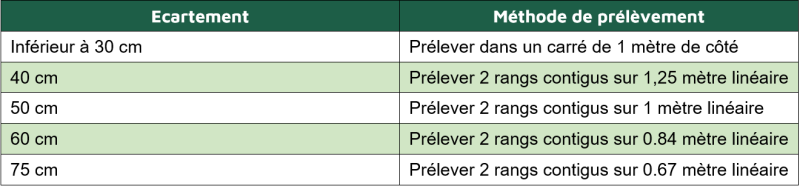
In plots with heterogeneous rapeseed, it is recommended to take 4 samples, at different representative locations in the plot, avoiding the edges. The average value will then be used to calculate the forecast dose.
To avoid any measurement bias, particularly when sampling in rainy weather or heavy dew, it is advisable to shake the plants well to remove any drops of water from the leaves and any clumps of earth from the base of the stem.
To help you
Take a look at this tutorial
Other tools to calculate nitrogen doses directly
Today, there is a wide range of operators offering spatialized nitrogen advisory services for rapeseed, based on image processing. They enable farmers who so wish to modulate inputs within the plot, either with a system controlled on the fertilizer spreader, or by modulating manually by large zones in plots presenting different states of growth. Among them, 4 products are the subject of a partnership agreement with Terres Inovia:
- Farmstar (Airbus, Arvalis)
- Agro-rendement (Wanaka/Agroptimize - Geosys)
- PRECIFert Azote (Precifield)
- Rapeseed Balance Sheet by Abelio (Abelio)
To facilitate field estimates, 2 smartphone applications, ImageIT (Yara France) and Crop-Analyser (Visio-Crop), are partnered with Terres Inovia. Biomass is estimated from conventional photographs, whose processing and interpretation are adjusted by the height of vegetation, to be entered before image processing.
For more information on alternative methods for estimating biomass and forecasting nitrogen doses for rapeseed , click here.
Calculating the forecast dose: Beware of overestimating requirements!
The Réglette azote colza® can be used to determine the total dose to be applied, based on a number of factors: rapeseed biomass, yield objective for the plot, soil type, organic fertilizer application, type of previous crop and, if applicable, the use of gelatinous legumes.
In order not to overestimate the crop's needs, and thus avoid unnecessary and costly over-fertilization, particularly in a context of high nitrogen fertilizer prices compared to rapeseed sales prices, it is advisable to first set a reasonable yield objective. To do this, calculate the average yield of the last 5 rapeseed crops on the plot or comparable plots, removing the lowest and highest values: this is the Olympic average.
Given the temperature conditions at the start of this winter, rapeseed crops in the South-West have lost more biomass than in previous years, when in some years they never really stopped growing and developing. So, in addition to estimating your yield target, you need to take into account the nitrogen absorbed in the autumn, by estimating biomass at the start of the winter (between 800g and 1.2 kg/m² on average, depending on the plot) or by processing satellite images taken between mid-November and early-December. The risk of not taking into account the nitrogen absorbed in the autumn, when the rapeseed has "melted" over the winter, is also an overestimation of the doses to be applied in the spring, by underestimating the quantities absorbed previously (see examples opposite).
Split your inputs according to the total dose to be applied
By dividing up the doses, you can adjust them to the plant's needs.
For low-growth oilseed rape crops, an early first application is recommended as soon as vegetation starts to grow again, as it is necessary to support the start of vegetation, as small plants have few reserves and cannot easily access nitrogen from the soil due to their weak root system.
On the other hand, for fast-growing rapeseed, it's advisable to wait until bolting before applying nitrogen; the remobilization of reserves accumulated in the plant's organs will be sufficient to ensure good vegetation recovery.
In all cases, do not apply more than 100 kg/ha of nitrogen at any one time.

Your regional contacts :
- Alexandra Denoyelle (a.denoyelle@terresinovia.fr) - Auvergne-Rhône-Alpes & Provence-Alpes-Côte d'Azur
- Quentin Level (q.level@terresinovia.fr) - Southern New Aquitaine, Gers, Hautes-Pyrénées
- Quentin Lambert (q.lambert@terresinovia.fr)- Occitanie